"Wait... Akaza is speaking perfect English?!"
We put ElevenLabs' 'Dubbing Studio' to the test—the ultimate tool that turns every fan's dream of localized content into reality.
But did you know that even state-of-the-art AI makes mistakes?
We are breaking down everything you need for flawless localization: the essential initial setup, manual editing hacks, and how to avoid costly credit traps.
Hey everyone! Welcome back to Sonetho. ⚡
Today, I'm thrilled to show you an English-dubbed trailer of Demon Slayer: Infinity Castle that I created entirely on my own.
No voice actors, no expensive recording booths—just pure AI magic powered by ElevenLabs' cutting-edge 2026 models.
📺 1. The Big Reveal: Is This Sync Even Real?
We kept the original background music and sound effects (SFX) fully intact, replacing only the original Japanese dialogue with a cloned English AI voice.
Pay close attention to how perfectly the emotional weight and character tone are preserved.
What do you think? That line—"A fine evening, isn't it..."—sounds like it was recorded by a professional Hollywood voice actor, doesn't it? 😲
⚙️ 2. Set Up for Success: The Essential Prep Guide
If you just drop your video in without optimizing your settings, you're setting yourself up for a headache. The initial configuration determines both the final output quality and whether you can actually fine-tune your project later.
🕵️♂️ Accessing the Menu & Creating a Project

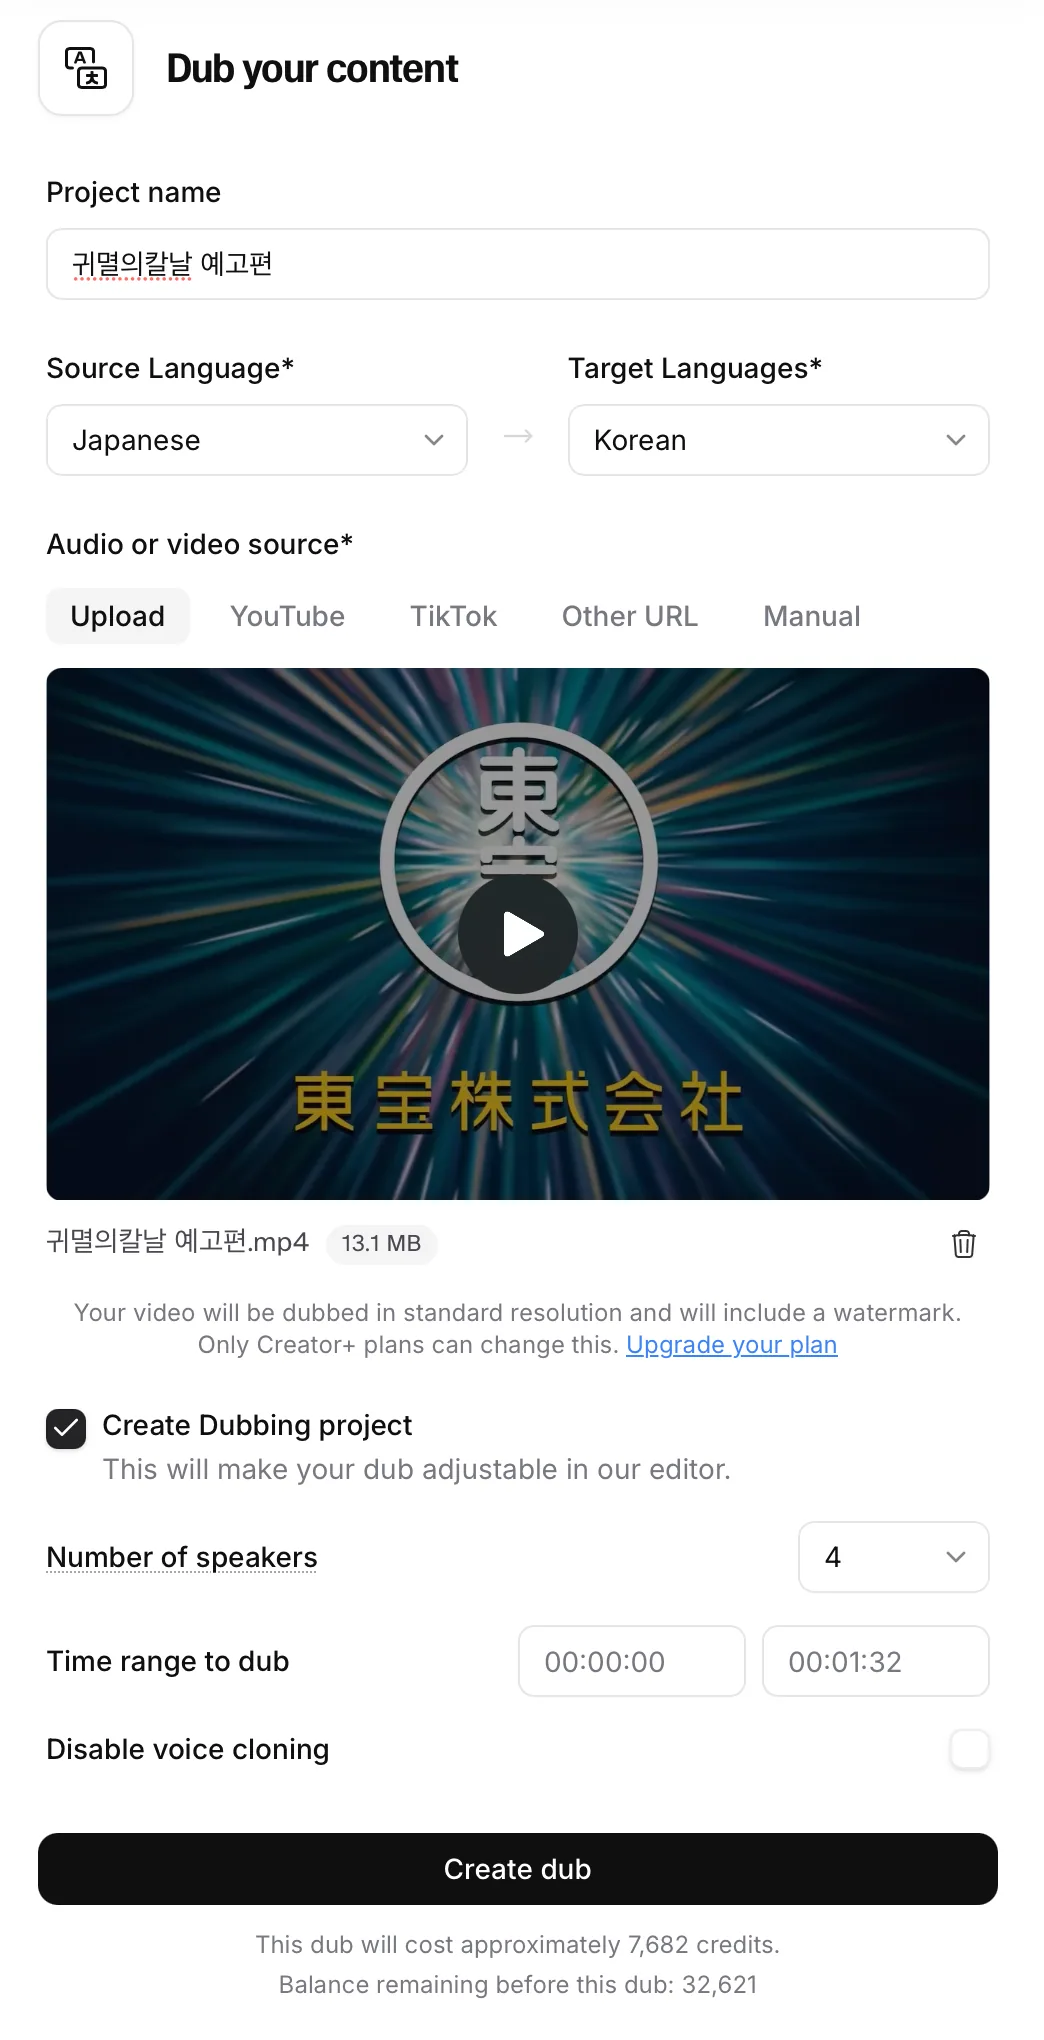
① Language Settings
- Source: The original video's language (e.g., Japanese)
- Target: The language you want to translate to (e.g., English)
② Create Dubbing Project (Enable this option! ⭐)
- Without enabling this, you won't be able to edit the script or manually adjust timing blocks on the timeline later. *(Note: This mode uses a few more credits, but it's an absolute lifesaver.)*
- Leaving this disabled means you'll only get a flat, uneditable final file.
③ Number of Speakers
- Whenever possible, specify the exact number of speaking characters in the clip.
- The more precise you are, the better the AI can differentiate unique vocal signatures—like telling Zenitsu's voice apart from Akaza's.
(If your scene has a massive crowd, leaving it on 'Auto' works just fine!)
④ Disable Voice Cloning
- Unchecked (Default): Clones the original speaker's voice to retain their signature tone, accent, and emotional delivery.
- Checked: Bypasses cloning entirely and substitutes ElevenLabs' standard preset voices instead.
🛠️ 3. AI Proposes, Humans Perfect (Pro Editing Hacks)
Think you can just upload a video, hit a button, and walk away with a cinematic masterpiece? Absolutely not.
Even with advanced 2026 AI models, manual touch-ups are where the real magic happens. Here are some of the funniest slips the AI made during my project and how I fixed them. Skip these steps, and your video will end up sounding robotic and disjointed.
🕵️♂️ Lab Director's Key Editing Highlights
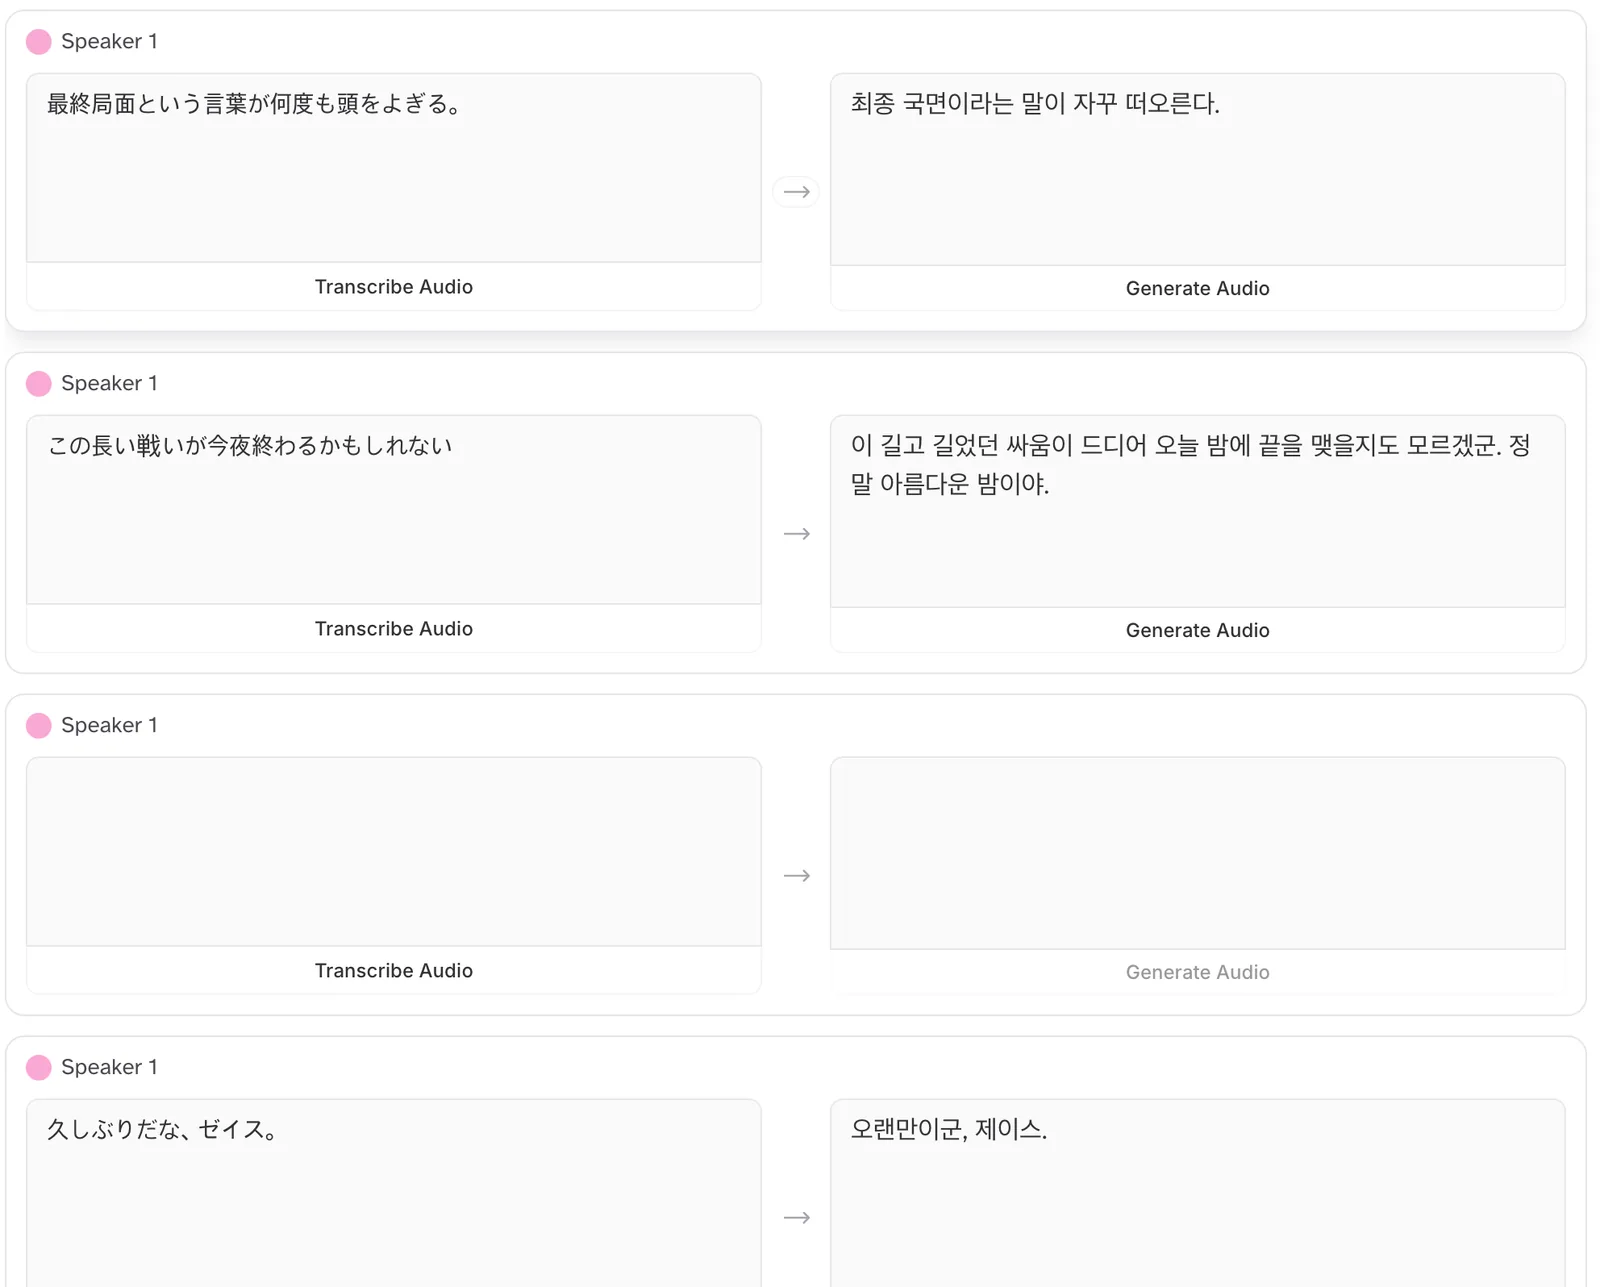
① Correcting Proper Nouns (Transcription Slip-ups)
- The AI's Mistake: It kept transcribing the character 'Zenitsu' as 'Janice' or 'Gen-Itsy'... (A classic automatic speech recognition hiccup!)
- 👉 The Fix: You need to manually edit these names in the script editor. Always double-check proper nouns, brand names, acronyms, and homographs!
💡 Pro-Tip: Multilingual AI models can occasionally get tripped up by homographs (like read vs. read) or complex acronyms (like trying to pronounce SaaS or spelling out IRS). If the AI mispronounces a word, try spelling it phonetically—such as writing "see-oh-pee-dee" instead of "COPD"—to force the perfect pronunciation.
② Recovering Missing Dialogue
- The AI's Mistake: When the soundtrack swells or a character whispers dramatically under their breath, the AI might miss the line entirely.
(In my project, a subtle whispered line got completely lost in the background noise.) - 👉 The Fix: Simply double-click on the timeline to manually add a dialogue block, then type in the missing line.
③ Prioritize Natural Flow Over Literal Translation (Localization)
- AI Translation: "It is feast time." (Sounds a bit like a medieval-themed potluck).
- 👉 The Fix: I changed it to "The banquet begins!" to match the theatrical intensity. *(Pro tip: For high-stakes localization, run your script through an advanced LLM like Claude 3.5 Sonnet or GPT-4o first to capture natural idioms, rather than relying solely on the default auto-translation!)*
④ Mastering Timing: Dynamic vs. Fixed Duration
- When you first generate a dub, the generated audio files might not align perfectly with the characters' lip flaps (lip-syncing).
- While you can drag the edges of the timeline blocks to stretch or compress them, understanding these two modes is what makes the real difference:
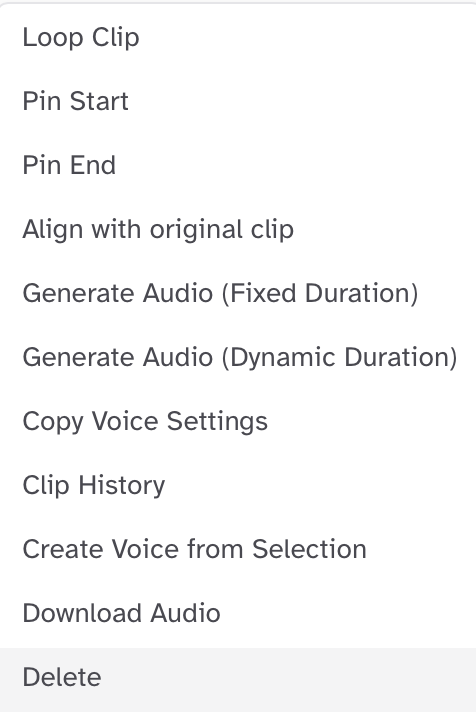
🎯 Dynamic Duration (Default)
No matter how much you stretch the block on the timeline, the AI reads the text at its native, conversational speed.
While this keeps the pronunciation completely natural, it can look poorly synced if a character takes a long, dramatic pause on screen.
🎯 Fixed Duration (Essential ⭐)
Enabling this forces the AI to dynamically speed up or slow down its delivery to match the exact duration of your timeline block.
It will expand or compress the speech naturally, adding dramatic pauses where needed and making manual lip-syncing a breeze.
"Mixing and matching these two duration modes is the ultimate secret to nailing a polished, cinematic performance that feels like it was directed in a real studio."
💸 4. Avoid the Dubbing 'Credit Trap'
Here is a crucial, cost-saving tip. Learn from my mistake so you don't accidentally burn through your entire monthly tier allowance on a single run! (RIP to my lost credits... 😭)
⚠️ Warning: Unused Project Credits Are Locked!
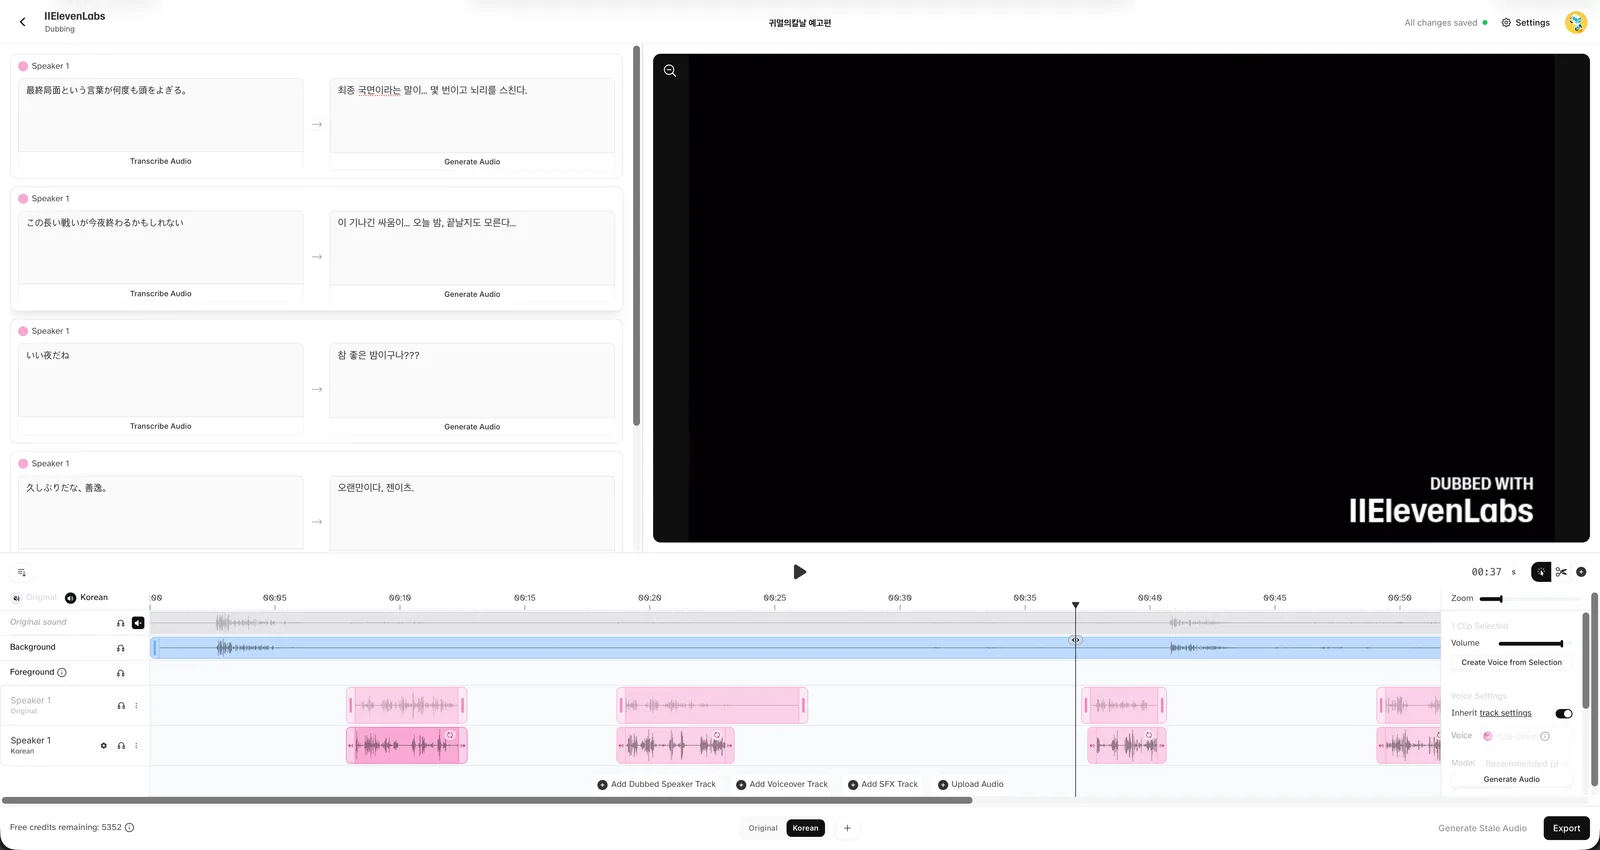
When you upload a file, Dubbing Studio pre-allocates an estimated credit amount based on video length. Even if you complete your edits and have leftover credits (like the 5,352 credits shown above), those allocated credits remain locked to that specific project's rendering engine. You cannot roll them over to a brand-new project.
✅ Pro-Tip to Save Credits:
Never upload a massive 10- or 20-minute file all at once.
Slice your video into 1-to-2 minute segments (which is perfect for YouTube Shorts, Reels, or TikTok anyway) and dub them piece-by-piece. This is the single best way to avoid wasting valuable credits.
🎓 Want to take your dubbing to the next level?
Want to go beyond basic text-to-speech and perfectly capture a character's subtle sighs, gasps, and emotional micro-expressions?
We put ElevenLabs' flagship cloning methods to the test: Instant Voice Cloning (IVC) vs. Professional Voice Cloning (PVC) vs. Voice Design.
🚀 Become a Global Creator from Your Home Studio
Whether you're targeting YouTube, TikTok, or Instagram Reels, immersive, high-quality audio is what drives algorithmic reach and holds audience retention.
Skip the thousands of dollars in studio gear and start localizing world-class content globally using just ElevenLabs.
We'll be sharing more creative dubbing workflows, AI experiments, and deep-dive tutorials on our channel, so make sure to subscribe!
📺 Subscribe to Sonetho
We'll be back soon with more advanced workflows, API tutorials, and feature breakdowns!
Until next time, this is Sonetho! ⚡